
Why Japan Is Worth Cycling Even If You’ve Never Been
Japan cycling routes have gotten complicated with all the misinformation flying around. Most people hear “Japan” and immediately picture language barriers, backwards traffic, and train systems that require an engineering degree to navigate. Then they close the tab and book a walking tour instead. I get it — I did the same thing twice before finally committing.
As someone who spent three separate trips convincing myself Japan was too complex for solo cycling, I eventually learned everything there is to know about making it work. Today, I will share it all with you.
Here’s the thing nobody tells you upfront: Japan might actually be the easiest country on Earth to cycle through, provided you know what’s coming. The roads are maintained obsessively. The infrastructure exists and it works. And the cycling community — locals included — is genuinely welcoming to foreigners who show up prepared and humble.
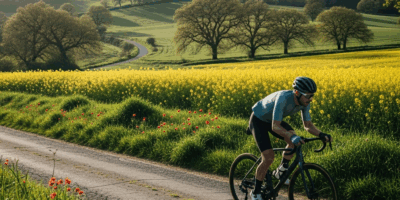
The Shimanami Kaido alone has converted more nervous first-timers into confident international tourers than any other single route I know of. Seventy kilometers. Six islands. Dedicated cycling paths. English signage that actually makes sense. That’s where it clicks for most people — why they come back to Japan specifically to ride bikes.
What to Know Before You Ride in Japan
Probably should have opened with this section, honestly. Motivation is great until you show up to a rental shop and discover they don’t stock anything above a 54cm frame, or that you’ve completely misread how bike transport on trains actually works. Logistics first. Enthusiasm second.
Bike Rentals—Where to Actually Rent
Two real options exist. Small local shops in tourist areas, or dedicated cycling outfitters. Local shops run cheap — typically ¥1,000 to ¥2,500 per day, somewhere between $7 and $17 USD — but inventory is wildly inconsistent. I once burned three hours in a Hiroshima rental shop while a mechanic adjusted a bike that was never going to fit me properly. Don’t make my mistake.
Cycle-specific outfitters — Giant Store rental franchises, local touring operators — cost more. Expect ¥3,000 to ¥5,000 daily. But they maintain equipment properly, understand what touring cyclists actually need, and often bundle luggage storage or baggage forwarding to your next accommodation. Anything longer than two days? Pay the premium. It’s worth it.
Book ahead through their websites or Booking.com. Walking in and expecting availability is optimistic at best.
Left-Hand Traffic and Road Rules
You ride on the left. Full stop. Your muscle memory will fight this for roughly 20 kilometers. Then something in your brain recalibrates and it just clicks.
Helmets aren’t legally required — wear one anyway. Lights are required, and most rental bikes include basic front and rear units. In rural areas, cyclists ride on the road. In cities, sidewalks are standard, which feels counterintuitive until you realize Japanese sidewalks are wide, well-maintained, and culturally understood as shared space.
The surprise I wasn’t expecting: Japanese drivers are genuinely patient. Honking is rare. Passing is deliberate and considerate. Nothing like what I’d braced for.
When to Go
Spring — late March through May — and autumn — September through November — are your windows. Summer brings oppressive humidity and real typhoon risk. Hokkaido in winter is legitimately dangerous unless cold-weather riding is already your thing.
Golden Week in late April and early May floods popular routes with domestic tourists. Early October is honestly perfect. Temperatures drop, rain backs off, crowds thin. That’s the sweet spot.
The Best Japan Cycling Routes for First-Timers
1. Shimanami Kaido—Onomichi to Imabari (70 km, 3 days)
This is where you start. No debate. The route connects six islands between Onomichi on Honshu and Imabari on Shikoku via dedicated cycling paths and genuinely quiet roads. Terrain is gently rolling with one real climb on Day 1. Daily distances break into roughly 25 km, 20 km, and 25 km across three days.
Difficulty: Easy.
But what is Shimanami Kaido, really? In essence, it’s a purpose-built cycling corridor spanning an inland sea. But it’s much more than that — island fishing villages, mandarin orange groves, shrine stops every few kilometers. Cultural immersion without the suffering. That’s what makes Shimanami Kaido endearing to us first-timers. So, without further ado, let’s cover logistics.
Rent from one of the cycle stations in Onomichi directly — the tourism board office handles rentals. Take the ferry between Island 2 and Island 3. It costs ¥700, about $4.50, and cuts 15 km off your day. Most guesthouses will ship your bag forward via takkyubin — Japan’s baggage forwarding service — for ¥1,500 to ¥2,000. Use it.
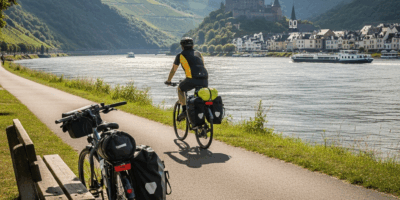
2. Lake Biwa Loop—Otsu (200 km, 5–7 days)
A full circumnavigation of Japan’s largest freshwater lake. The eastern shore runs rural and quiet. The western side near Maibara picks up traffic. Elevation gain is real throughout, but nothing steep — this is endurance cycling, not mountain climbing.
Difficulty: Moderate.
Break it into 50–80 km daily segments and you’ll finish in a week without grinding yourself down. The northern stretch around Hikone is genuinely beautiful — castle town, calm water, old streets. Small towns appear frequently enough that resupply is never a genuine concern.
Start from Otsu, which sits just south of Kyoto with clean train connections. Tackle the western loop first — less crowded, slightly more forgiving. Rent from Otsu’s Lake Biwa Tourism office. Navigation here relies on Google Maps and comfort with occasional detours, so download offline maps before you leave your accommodation.
3. Kyoto to Nara (50 km, 1 day or 2)
Bamboo groves. Rice paddies. Two of Japan’s most historically significant cities connected by quiet back roads and canal paths. Elevation is negligible. The route itself is peaceful in a way that the cities flanking it simply aren’t.
Difficulty: Easy.
Four to five hours of pedaling puts you into Nara with enough afternoon left for temple wandering. Cultural payoff is immediate. This works brilliantly as an introductory ride — short enough to stay fun, long enough to feel like an actual cycling day.
Rent from Kyoto Eco Trip or a comparable shop near Kyoto Station — they provide route maps and know the logistics. Ship your bag from Kyoto to Nara via takkyubin for ¥1,200 to ¥1,500 and ride with just a day pack. Avoid this route entirely during Golden Week, New Year, or Obon in mid-August. Traffic gets surprisingly ugly.
4. Izu Peninsula Coastal Route (80–120 km, 2–3 days)
South of Tokyo. Dramatic coastline, volcanic rock formations, short punchy climbs with mountain backdrops. More challenging than Shimanami — the climbs are sharper — but the scenery is a fair trade.
Difficulty: Moderate to Moderate-Hard.
Hot spring towns punctuate the route, which means soaking tired legs at the end of each riding day. Fewer first-timers attempt this one, which translates directly to fewer tourists and a more authentic feel. Summer is brutal here. Autumn is ideal — same as everywhere else in Japan, honestly.
Rent in Atami or Ito, both of which have direct train connections from Tokyo. The towns are small. Book accommodation ahead — winging it is a gamble you will probably lose. Coastal road maintenance is excellent; summer traffic is the only real friction point.
How to Handle Bike Transport Between Cities
Frustrated by confusing rinko bag instructions written entirely in Japanese, most first-timers give up on train transport entirely and either rent point-to-point or skip multi-city routes altogether. There’s a better way.
A rinko bag is a protective bag built specifically for disassembled or folding bikes. Standard road or touring rentals — non-folding — can travel bagged on many train lines. The process: partially deflate tires, rotate handlebars parallel to the frame, bag everything in a rinko bag your rental shop provides, or buy one for ¥3,000 to ¥8,000. Bulky, but it fits in designated bike spaces on most long-distance JR trains.
The catch nobody mentions upfront: not all train lines allow bikes. JR lines — Japan Railways, the national network — generally accept bagged bikes without issue. Private lines like Kintetsu and Hankyu operate stricter rules. Call ahead, or ask your accommodation to verify before you show up at the platform with a 12kg bag and nowhere to put it.
I’m apparently someone who finds rinko bag logistics genuinely stressful, and takkyubin works for me while wrestling bikes onto trains never really does. Yamato Transport or Sagawa Express will collect your bike from your accommodation, move it to your next city, and deliver it there. Cost runs ¥2,000 to ¥4,000 depending on distance. I used this system twice and never once regretted it.
Ship the evening before you travel. Overnight delivery is standard. Confirm your next accommodation accepts deliveries, then send them the tracking number.
Where to Stay and How to Plan Your Daily Distances
Cycle-friendly accommodations break into three real categories. Dedicated cycle hotels — most expensive, best equipped. Traditional Japanese guesthouses, either minshuku or ryokan — welcoming but variable. And rider houses, budget hostels built specifically for touring cyclists.
Cycle hotels along Shimanami Kaido offer secure bike storage, on-site repair tools, and hosts who understand cycling logistics without needing explanation. Expect ¥6,000 to ¥12,000 per night, roughly $40 to $80 USD. Worth it if you’re anxious about bike security or might need mechanical help mid-trip.
Minshuku and small family inns run ¥4,000 to ¥7,000 nightly. Less accustomed to cyclists, but genuinely hospitable — many will rearrange storage to fit your bike without being asked. Home-cooked breakfast sometimes included.
Rider houses — sometimes listed as “cyclist houses” — cost ¥3,000 to ¥5,000 and appear mainly along major touring corridors. Communal, social, occasionally loud. Shared bunks. The real value is the knowledge-sharing with other riders who’ve just done the sections you’re about to attempt.
For navigation, use Google Maps offline — download maps before you leave your accommodation each morning — or Komoot, which carries Japan route data and functions without Japanese language fluency. Komoot specifically offers curated routes filterable by difficulty and daily distance. Both display elevation profiles that actually matter when you’re planning tomorrow’s energy expenditure.
Target 60 to 80 km daily for your first multi-day tour. On a 70 km day with two real rest stops, you’re pedaling four to five hours. That leaves time for lunch, cultural stops, and arriving at your guesthouse functional rather than destroyed. This new approach to pacing took off among touring cyclists several years ago and eventually evolved into the daily distance framework enthusiasts know and swear by today.
The infrastructure exists. The routes are proven. The only thing standing between you and actually doing this trip is booking it.

Stay in the loop
Get the latest cycle routes world updates delivered to your inbox.